Home > PC Assembly > Install PSU
How to Install a Power Supply in PC Case
Bottom-Mounted PSU Installation Walkthrough for Beginners (With Photos)
In this step-by-step PSU installation guide for beginners, we'll explain how to install a power supply into a desktop computer case in an easy-to-understand way without the confusing tech jargon or advanced lingo.
This tutorial applies to all types of ATX power supplies, whether you want to know how to install a modular PSU, semi-modular PSU, or non-modular PSU (we'll explain any things to know or nuances of either type as we go along).
Note: This PSU installation guide is part of our full How to Assemble a PC tutorial. Refer there for all PC building steps.
Installing a power supply into your PC is simple, and shouldn't take you long even if you're completely new and building your first computer.
It's just a matter of positioning it the right way around for the best airflow, slotting it into your case, and securing it with the screws provided.
If you're wanting to learn about the power connections instead, see our separate guide to connecting PSU cables (the next step to take after you learn how to physically install your power supply).
See Also: Power Supply Cables Guide
1. Check for Rubber Feet in Bottom of Case
Before learning how to install a power supply into your case, you want to check for the presence of little rubber feet on the bottom of your computer case. This is assuming you're installing a PSU in the bottom of your case, which is how every modern case is designed these days. Top-mounted power supplies is a thing too, but a thing of the past.
Related: How to Choose a PSU for Gaming
Many cases have rubber feet to help reduce the effects of PSU vibration to lower noise. If your case does have rubber feet like our Cooler Master N200 does, they'll likely already be pre-installed, but if not then check if your case provided you with some and go ahead and install them as per your case manual instructions.
If your case doesn't have rubber feet, it's not the end of the world, but you could always buy some small self-adhesive rubber pads from your local stationary store if you wanted to (and especially if your power supply vibrates loudly once your new system is operational).
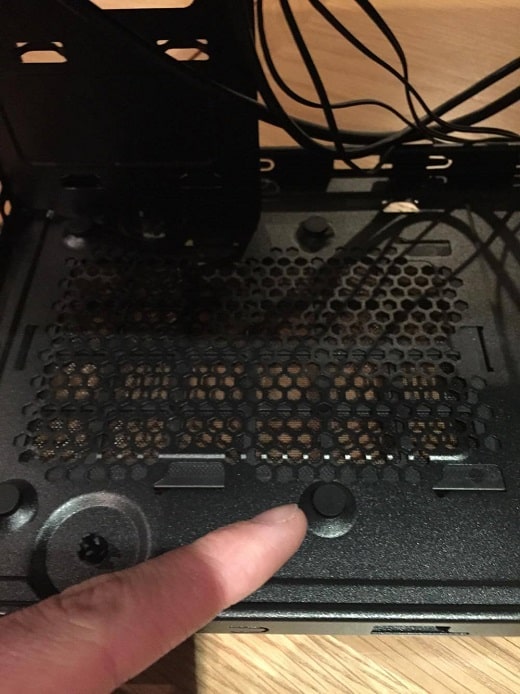 These rubber pads help reduce your PSU vibrating with the case
2. Attach Required Cables to Modular PSU (Optional)
If you are installing a modular power supply (one where you can choose which power cables to attach and which to leave in the PSU box), it might help if you attach the power cables that you'll need to your PSU before you physically mount it into the case. In some cases, it could be a little tricky for you to go in and attach the power cables later on after the PSU has been installed. But just ignore this if you can easily reach the power connectors on your modular PSU even after it's sitting in the bottom of your case.
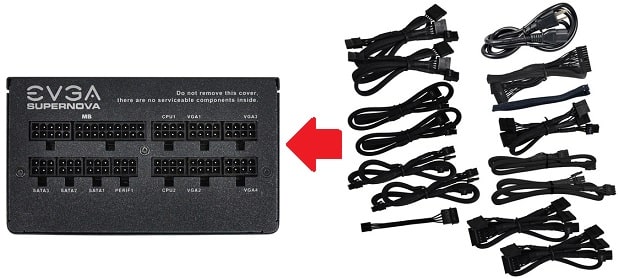 If you think the PSU connectors will be hard to reach once the unit is mounted, attach cables now
3. Decide Which Way to Install PSU (Fan Up or Down)
Before physically mounting the power supply into your case, you want to first figure out the best orientation/positioning for the PSU installation. In other words, you can choose between installing the power supply with the intake fan facing upwards towards the inside of your case, or facing downwards through the vents on the bottom of your case (which most modern cases will have).
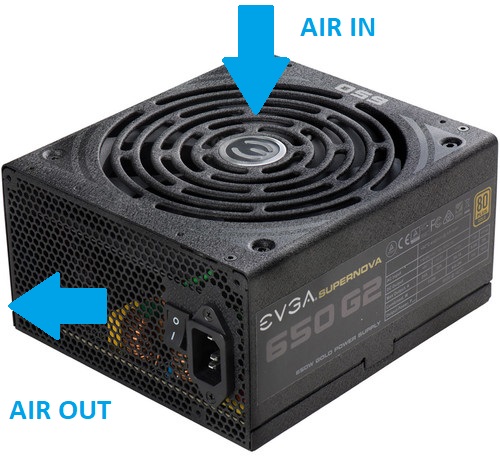 Modern PSUs have an intake fan that draws air in and releases it through the back
So, which is best? PSU intake fan up or down? It's a good question, and a topic of much debate as with most cases you have the choice of either orientation.
The difference in performance won't be huge as these days most decent modern PSUs are quite efficient (and the fan won't always be running), so in most builds where you have the choice of the PSU fan vs down, either option is going to be just fine (so don't stress too much over your decision!).
However, there are certain situations where you should favor installing the PSU fan either up or down for optimal airflow and cooling:
- Placing your new computer on carpet? Position the PSU fan facing upwards to avoid the fan choking/overheating. Although you could still face the PSU fan down if you place a hard, flat surface under the case to avoid issues with the carpet.
- Have just one rear exhaust fan in your case? Consider positioning the PSU fan facing up for neutral pressure within the build (see Jay's explanation of this here).
- Placing your computer on a desk or other non-carpet surface? Position the PSU fan down.
- Have a case with a PSU shroud that has a solid top panel? Position the PSU fan down. Some cases have PSU shrouds with a vent on top though (instead of a solid panel), in which case you can choose either PSU fan orientation.
- Installing a custom water cooling loop? Definitely position the PSU fan down to avoid water leaking into the PSU.
Just remember to only install the PSU with the fan facing down if your case has bottom vents, though most cases will. Also, if positioning the PSU fan down towards the bottom grill, make sure you maintain some sort of clearance between your case and the surface it's on so that the fan can suck in air properly (and not overheat/choke). Most cases will be raised enough by its feet though so you should be fine.
For the example PC build we're installing here in this tutorial using the Cooler Master N200, we will mount the power supply with the fan facing up because the user of this system will sit the machine on carpet.
4. Mount Power Supply in Bottom of Case
Before installing a power supply into your PC, remember to ground yourself before physically handling your power supply or the inside of your case by either wearing an ESD wrist strap (see the tools you need to build a PC) or by regularly touching a metal object.
Now you know the right way to install your power supply, it's time to fit it in the bottom of your case, which is where most modern cases house the PSU as mentioned earlier. If you're installing a top-mounted power supply, the process is going to be very much the same as you just need to slot it in and screw it into the place like we'll be doing here for our bottom-mounted PSU installation.
If you have your case lying on its side from previous installation steps, to install your power supply unit you'll want to sit your case upright. Go ahead and place the power supply unit in the bottom of the case, making sure the power socket and power switch face out the rear of the case, with the cable connections facing into the case.
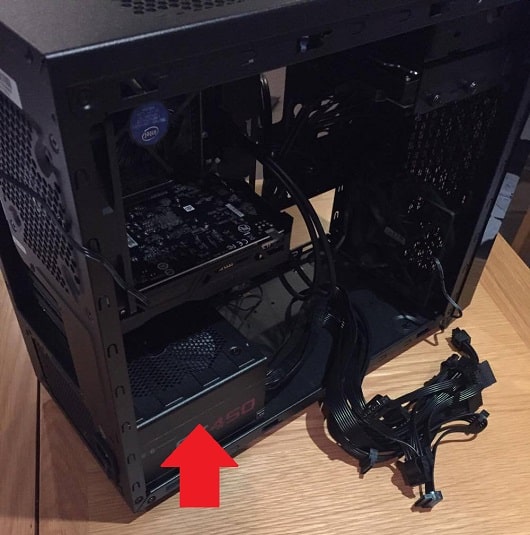 Because this particular build will eventually live on a user's carpet, we're installing the PSU fan facing up to avoid potential choking/heating issues
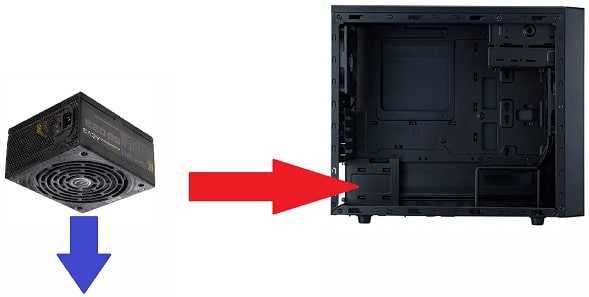 If your PC won't be on carpet, and your case has bottom vents, install the PSU fan facing down
5. Secure Power Supply to Case With Screws
Line up the screw holes on the back of the case with the PSU, and while holding the PSU firmly in place go ahead and screw them in with the screws that should have been provided with your PSU. Otherwise, use screws provided by the case. Tighten them nice and firmly, but not overly tight.
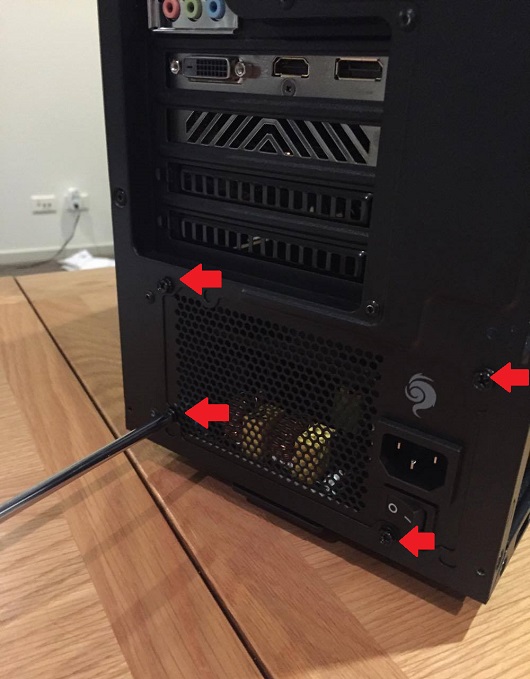 Screw your new power supply in at each corner with a screwdriver
That's all there really is to know on how to install a power supply. Now it's time to connect the cables to the rest of your build, including a little simple cable management to keep things neat and tidy (which also helps maximize airflow within the case and maintain safe GPU temperatures as well).
Next: How to Connect Power Supply to Motherboard
Value CPUs of the Month (Feb 2025)
- Intel Core i5 12400F (6 Core)
- AMD Ryzen 5 7600X (6 Core)
- AMD Ryzen 7 7800X3D (8 Core)
Trusted VPN
VPN software can be important in this day and age, especially if you do lots of online banking and/or use public WiFi whilst travelling. Having a VPN adds an extra layer of security to your PC or laptop to help protect your details such as financials, banking activity, etc. There are also benefits to using VPNs for gaming.
Because they're so popular these days, there are countless VPN providers, and it can be confusing to pick one. If you want my 2 cents, after a lot of research I decided on NordVPN 'cause it's one of the fastest, most reliable VPNs for both gaming and general use, with a lot of credible reviews out there backing that up. They also quite often run very solid deals.
Popular Articles
Value GPUs of the Month (Feb 2025)
- Gigabyte Radeon RX 7600 XT Gaming OC (16GB)
- Gigabyte Radeon RX 7800 XT Gaming OC (16GB)
- ASUS GeForce RTX 3060 Dual V2 OC (12GB)
Search the Site
About Me (2025 Update)
I'm an indie game developer currently developing my first public release, an immersive VR spy shooter with sci-fi themes set to release on Steam, partly inspired by the likes of Perfect Dark, MGS2, HL2, Splinter Cell, and Deus Ex. Researching, writing, and updating this site helps a little with self-funding the game, as I earn a few dollars here and there from Amazon's affiliate program (if you click an Amazon link on this site and buy something, I get a tiny cut of the total sale, at no extra cost to you).
I hope the site helps save you money or frustration when building a new PC, and makes your PC building journey easier and more fun. If you want to support the countless hours that's gone into creating and maintaining the site, besides using my Amazon links if purchasing something, sharing an article on socials or Reddit does help out and is much appreciated. I also accept coffee.

