Home > PC Assembly > What to Do After Building
What to Do After Building a Computer
9-Step Checklist to Setting Up a New PC (Enter BIOS, Install OS, Update Drivers & More)
Last Updated: February 25, 2023
What do you do after building your computer and successfully booting up your PC for the first time? The finish line is in sight, but there's still a few key steps left to finish off your new custom gaming or work computer.
It's time to enter the motherboard BIOS software, set RAM speed, set the boot sequence for your operating system installation, install the OS, download any necessary drivers, and a few other things if you really want to be thorough. Confused? Don't worry, we'll go through each step one at a time, all explained in simple language minus the jargon.
See Also: How to Assemble a Computer
1. Enter the Motherboard BIOS
The very first thing to do after building a PC is to enter the BIOS or UEFI. The BIOS (short for Basic Input Output System) is software that comes pre-installed on every motherboard, and is like the main hub of your system where you can control various settings such as how your PC boots up, how your fans run, how your memory runs, among other things. A UEFI is the same thing but with a more modern graphical interface, but is still often referred to as the BIOS as well. So from here, to keep things simple, we'll just refer to either the BIOS or the UEFI as simply the BIOS.
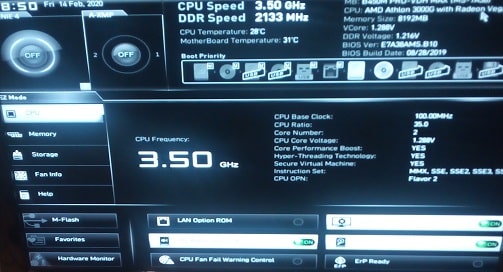 What a typical BIOS home screen looks like
To enter the BIOS, just after pressing the on button of your PC, you'll need to press a certain button on your keyboard to access the BIOS. Which button you need to press will depend on your motherboard, but it will usually be either ESCAPE, DELETE, F1, F2, F8 or F10. Which button you need to press may be written on-screen just after the PC starts up, otherwise check your trusty motherboard manual (or, you could just mash all of the aforementioned keys).
You'll have to time the keypress for just a little after you press the on button, yet not too long after pressing it. Your timing may be off so if you're too late and don't press the required key in time, you will have to turn off your PC and try again.
Once your BIOS comes up, you'll either notice either a very old-school, basic looking menu screen that can only be accessed with your keyboard controls, or a more modern BIOS with mouse access that comes with some (typically higher-end) modern motherboards.
When you first see a BIOS in action for the first time, it may seem a little daunting with all the settings and different sub sections, but don't worry because you won't need to tinker with it much (if at all) as the default settings are often exactly what you need. We will likely have to change the boot order to be able to install the OS, and may have to manually set memory speeds too, but apart from that most people won't have to do anything else in the BIOS.
2. Set Memory Speed
Next step to do in the BIOS after building your PC is to set the correct RAM speed. For this step we have a dedicated guide:
3. Check Storage Drives and Fans
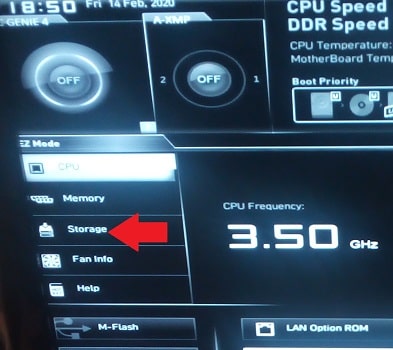
While not necessary as you shouldn't be having any issues if you put your PC parts together correctly, if you want to be a little thorough on checking your system, while you're in the BIOS you might as well check that your storage drives are all showing up properly (and therefore connected properly) by clicking on 'storage' from the main screen:
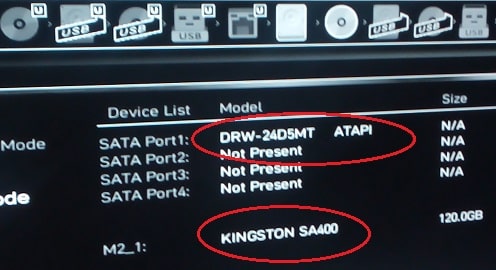
Then look that all your SATA drives (SSD or HDD) and M.2 drives (SSD only) are showing:
If you have any case fans connected to the motherboard - as most case fans will be - you can check that they are working in the BIOS. You can also change their speed if you want to as well, or set a fan curve that dictates how fast your fans will spin depending on system temperatures.
If you have fans plugged directly into the power supply, those won’t be able to be monitored or altered. To check your fans, simply click 'Fan Info' or something along those lines from within your BIOS menu. If you can’t find it for your particular BIOS, check help articles on your motherboard manufacturer’s website or the motherboard's manual itself.
4. Set BOOT Drive for Your Operating System
Before any settings you changed in the BIOS are applied permanently, you need to make sure you click 'Save Changes and Exit' which should show as an option when you press the 'Escape' key. But before that you need to set the boot order if you want to move straight onto installing your OS (Operating System, eg Windows 10 or 11).
If you’re ready for OS installation, let’s set the boot order. The boot order (or boot sequence) controls which device your PC attempts to boot from when it starts up or when it restarts. It should be found in the top of the main BIOS screen as pictured below. You want to set it to the device from where you'll be installing your operating system, whether that’s a USB dongle or DVD Disk:
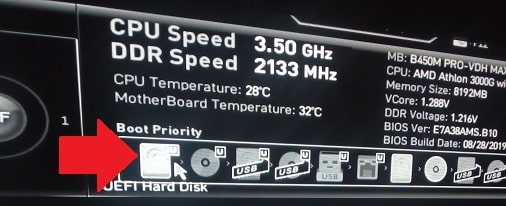 We have a Windows USB so the boot drive needs to be changed from this Hard Disk to the USB icon instead
Sometimes it can be confusing to know which icon is the correct one for your USB drive, so you may have to work it out through trial and error by testing different icons and restarting your system to see if it works. Just make sure to select 'save and exit' every time you make a change otherwise your change won't be registered.
After installing your OS (covered in a moment), if every time you boot-up your system it keeps asking you if you want to boot from disk, you'll need to re-enter the BIOS and change the Boot Order/Sequence like you did before so that your primary SSD/HDD (where Windows was installed) is at the top of the sequence.
A Side Note on BIOS Updates
Motherboard manufacturer's sometimes release newer versions of their BIOS. However, unlike other software updates on your computer which are a typically mandatory and standard procedure (such as updating Windows which is always a good idea unless you have a good reason not to) it's generally NOT recommended to update your motherboard's BIOS unless:
- You know that updating the BIOS will fix a certain issue/bug you're having with your system
- If installing new hardware that would only be supported by a BIOS update (eg new CPU)
Apart from that, I would forget about updating the BIOS. Updating a BIOS can be a risk. Worst case is you kill your motherboard if you don't do it properly. By all means go ahead and update the BIOS if you need to, as you'll be fine if you pay close attention and take things real slow, but just thought I'd give you a little warning and heads-up because people do screw up their systems via BIOS updates.
Related: How to Update a BIOS Without a CPU
5. Install Operating System
Once you've done whatever you need to do in the BIOS, it's time to install your operating system software. We'll cover the basic steps to Windows installation, which is what most beginner PC builders will use, as while Linux is free it is a lot more involved and not recommended if you're new to the PC world. If you do want to use Linux (it does offer more control for advanced users), you'll want to invest a few days or so to learn the basics.
Installing Windows 10 or 11 is a simple process, and simply a matter of following the on-screen instructions. First of all, if you downloaded Windows to a USB (recommended unless you bought a physical Windows DVD) and you haven’t bought a product key yet (but plan to later), you can still use Windows in the meantime. To do so, when it asks for your product key select "I don’t have a product key" found at the bottom:
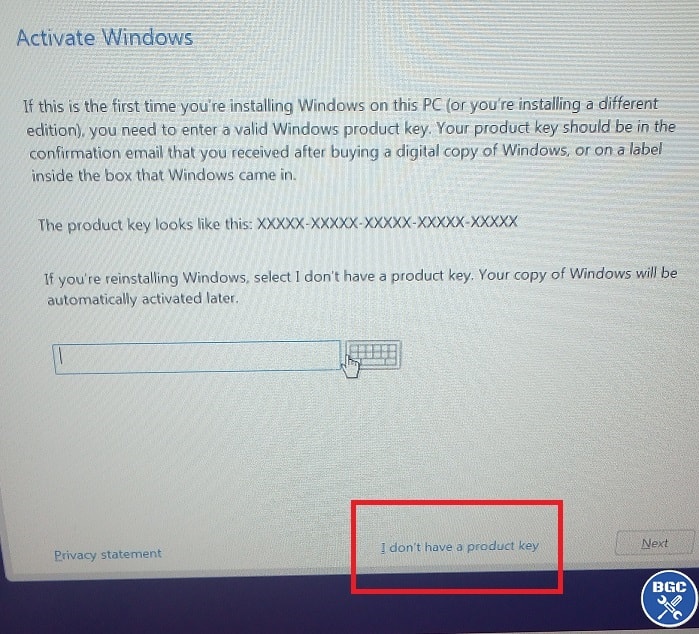
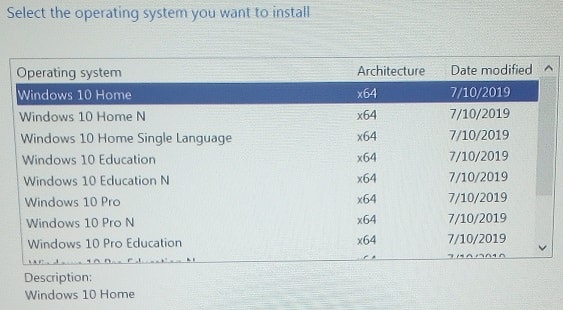
For Windows installations from a USB drive, it will also ask you what version of Windows you want to install (when you download Windows onto a USB, it includes the installation data for various editions).
Make sure to select the edition that you want to activate Windows for, which will be Windows Home for most people. If you want Windows Pro, select that but keep in mind that a product key will cost a fair bit more.
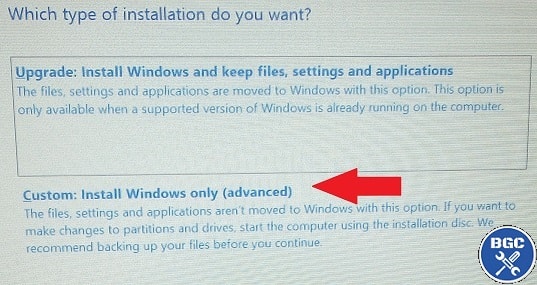
When it asks what type of install to do, choose "Custom":
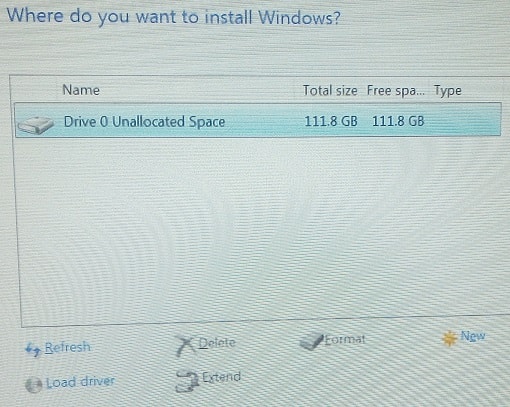
Then, you'll be asked where to install Windows by showing you a list of your drives. Select the SSD/HDD where you want Windows (hopefully an SSD in this day and age!), which should be listed as having 100% free space. If you have multiple drives connected, make sure you’re selecting the correct one.
Also, for anybody who has installed previous versions of Windows in the past and are wondering about whether to create a separate partition on your drive for Windows, these days there's very little need to do so don’t worry about that.
At some point it will ask you to connect to the internet if your WiFi isn’t automatically being detected (assuming you have a WiFi motherboard or wireless adapter installed). If you're using a wired connection, go ahead and plug in your Ethernet cable if you haven't already. This is so Windows can get straight into updating itself. If you don’t have internet configured yet, just skip this and complete the upcoming section on downloading drivers when you are connected to the internet.
Related: Ethernet vs WiFi for Gaming
Once Windows is done installing, it will restart your PC. At this point I would re-enter the BIOS and set your boot drive as your main system drive just to be safe. This is to ensure you don’t encounter boot problems in future, and that your PC knows to boot from the right SSD/HDD when starting up.
6. Update Windows
Before you update your device drivers in the next step, now is a good time to update Windows to its latest version if it hasn't already started doing so. You could perform this update after updating your drivers, for example if you want to use your new computer right away as the Windows update may take hours, but in general we recommend you to update Windows before your drivers just to be safe as they could interfere with one another.
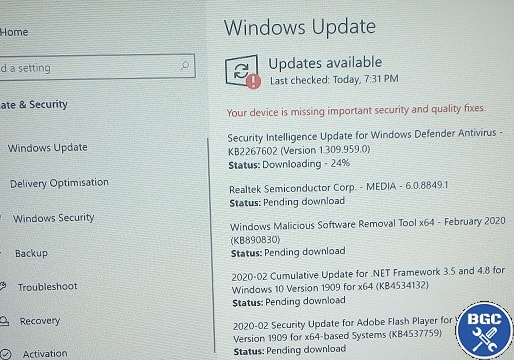 In the Windows search bar, type 'update' to find the updates section
7. Download GPU and Motherboard Drivers
Drivers are software applications that allow a computer to communicate with your hardware devices. Most if not all of the drivers you need for a new PC build will be taken care of by Windows or the Windows update automatically, however you’ll want to manually install the latest graphics card drivers from either NVIDIA or AMD, as well as install motherboard drivers directly from your motherboard manufacturer's website. These are the 2 important ones.
To download motherboard drivers, see that guide I just linked. For your graphics card, simply go to the NVidia or AMD website, go to Support from the main menu, and select your card series, model, and operating system. Download and install. For NVidia drivers, you have the option of getting the Game Ready Driver or Studio Driver. Stick with the game ones unless you’re primarily using your PC for video editing, graphic design, etc.
To double check which other drivers may be necessary for your particular PC (besides the GPU and motherboard which you need to do yourself), use the Windows Search bar to open up the "Device Manager" to look at all your devices. If there are any with warning icons that say something is missing then you know you'll need to go and grab that driver from the manufacturer's site.
You'll notice that some of your parts may have come with device drivers on CD (such as your sound card or optical drive if you used either of those components in your build), however these will be outdated so I wouldn't worry about them and instead I would just get them online.
You can install the latest drivers for all your other components if you really want to make sure, but like I mentioned the OS should take care of it and the graphics card and motherboard are the only ones I'd worry about. Without a graphics card driver your screen may not display properly. Graphics card drivers are also different than other drivers because they not only fix issues/bugs, but NVidia and AMD actually work to improve direct performance in specific games.
To download the latest version, search around your motherboard and GPU manufacturer sites, or just search direct in Google. Keep in mind you don't need to install all of the software available for that device, as just the main driver is what's important. Many manufacturers include optional, bloated versions of their drivers with programs and other extras you either don't need or wouldn't want on your awesome new system. Keep your system lean and mean.
8. Confirm Monitor Refresh Rate
If you're rocking a monitor with a high refresh-rate of 120Hz, 144Hz, 240Hz etc, running your screen at 60Hz is like using a RTX 4080 for 720p resolution. So, to avoid such wastage of quality equipment, check that your system is set to the correct refresh rate of your monitor. Even if you have a 75Hz screen, you might as well check it's not running at 60Hz.
For NVidia graphics cards, simply go to the NVidia control panel by right clicking your desktop screen (or search for it in the Windows search bar) and check the refresh rate that's listed matches your monitor.
For AMD cards, right click your desktop screen and go to Display Settings, then scroll down to Display Adapter Properties. Now select List All Modes, choose your refresh rate, then click Apply. For dual or triple monitor setups, you'll need to select the other monitor/s in the Windows Display settings and repeat the process for each screen you have.
9. Install Utility Applications (& Check Temps)
The last "must-do" step to do after building a PC is to install a small range of good-quality, useful utility programs for important things such as security, system monitoring/tweaking, and so on. That said, unless you know what you're doing, don't go too crazy and immediately clutter your brand new system. Here's my current recommendations on what to install on fresh new PC builds these days:
After adding a small handful of some top-notch programs, you're on your own my friend. Time to load up your favorite game and do what you do best. I could go on with more things to do after building a PC, but I'll leave it here otherwise this article will go on forever.
But one popular thing to do is to stress-test your system to see how it performs, and to check for safe GPU temperatures while you're at it to confirm that your graphics card (usually the hottest component in a gaming PC) isn't getting too hot when under load and is well-cooled. To check CPU temperatures you can use the programs recommended in the guide to the best software for gaming PCs.
Advanced users may want to also look into overclocking the GPU or overclocking the CPU, but it's not recommended for most people. Anyway, good luck with your new system and hope this guide helped.
Trusted VPN
VPN software can be important in this day and age, especially if you do lots of online banking and/or use public WiFi whilst travelling. Having a VPN adds an extra layer of security to your PC or laptop when online to help protect your data, passwords, financials, etc from hackers or malicious programs. It can also let you access region-locked content (eg US Netflix from overseas). For gamers their can be even more benefits to using a VPN.
Because they're so popular these days, there are countless VPN providers, and it can be confusing to pick one. If you want my 2 cents, after a lot of research I decided on NordVPN 'cause it's one of the fastest, most reliable VPNs for both gaming and general use, with a lot of credible reviews out there backing that up. They also quite often run very solid deals.
Popular Articles (see all)
Search the Site
About the Author (2025 Update)
I'm an indie game developer currently very deep in development on my first public release, a highly-immersive VR spy shooter set in a realistic near-future releasing on Steam when it's ready. The game is partly inspired by some of my favorites of all time including Perfect Dark, MGS1 and 2, HL2, Splinter Cell, KOTOR, and Deus Ex (also movies like SW1-6, The Matrix, Bladerunner, and 5th Element).
Researching, writing, and periodically updating this site helps a little with self-funding the game as I earn a few dollars here and there from Amazon's affiliate program (if you click an Amazon link on this site and buy something, I get a tiny cut of the total sale, at no extra cost to you).
Hope the site helps save you money or frustration when building a PC, and if you want to support the countless hours gone into creating and fine-tuning the many guides and tutorials on the site, besides using my Amazon links if purchasing something, sharing an article on socials or Reddit does help and is much appreciated.

